News, tips, tricks and discussions related to web strategy, web design, and custom web application and database development.
We worked with the staff to identify changes to the website and database to help facilitate this new learning environment, and quickly rolled out those changes to support the staff and give them tools to react confidently to developments in the rapidly-changing environment.
As the vaccine rolled out in early 2021, we began discussing with OLLI what their plans were for returning to meet in-person, what they expected to happen over the next 12-18 months, and where they needed additional support.
The OLLI at American University Board of Directors decided to begin bringing their community back together in person for the fall 2021 semester. After more than a year of online learning, many things had shifted. They had to navigate public heath guidance, their own community’s needs and wishes, DC government regulations, and the guidelines set forth by American University for activities taking place on campus. Classroom space agreements with the university also temporarily shifted during this time.
Because OLLI opens registration in July, work on the database and website to support the hybrid structure began this spring to support the new hybrid model, and the changes were deployed in early June. Learn more about OLLI at American University.
Comments (0) Posted on August 5, 2021 10:24:43 AM EDT by Emily Guyton
In a recent article in Forbes, digital marketing executive T. Maxwell explained “...why it’s critical to have a website that operates like a well-oiled machine.” Lead generation is difficult enough as it is in today’s crowded marketplace. By the time a user’s eyeballs are on your home screen, it pays to be confident in your ability to direct them through whatever acquisition channel you have implemented.
That’s where we come in! The expertise we’ve gained in almost 20 years of developing databases, e-commerce platforms, membership and email systems, and many other technology solutions has equipped us to serve customers across a wide range of countries and industries. Our customizable CMS has served as the launching pad for the success of dozens of clients, and we’re always looking for one more!

One of the ways we’ve developed trust in the industry is through reviews from our satisfied customers. Many of them have taken the time to provide feedback on Clutch.co, a B2B services ratings and reviews platform that promotes businesses by providing independent verification of all reviews. Thanks to their work and our customers’ loyalty, we have achieved a 5-star rating on the site and earned a spot in the top 3 web development agencies in Baltimore and Washington.
One of our recent reviews came from a long-time partner who hired us to develop a website and custom CMS for their trade association and has continued to use our services for event redesigns and feature additions for over 15 years. They praised our development skills, efficiency, and dependability as the key to our successful relationship.

“Their team produces products and services on budget. I can’t ask for anything more than that. They’ve allowed me to be more efficient because I don’t have to assign staff to do what they’re doing.” - Joe Winterkorn, Vice President
Along with our listing on Clutch, our presence on their sister site The Manifest also increases visibility by placing us among the best web developers in the region. A third site, Visual Objects, highlights agencies through an image-oriented introduction to some of their portfolio items.
If you’re losing out on business, or your organization is not meeting the needs of your users online, don’t wait to make a fix! Get started on your way to a better digital presence (and better leads, too) today by reaching out to us.
Comments (0) Posted on January 17, 2020 1:23:22 PM EST by Emily Guyton
We established our company in 2001 to help clients develop digital platforms that help them effectively reach their customers. 
Our team at Modern Signal strives to deliver the best solutions to our clients, specializing in web development, web design and UX/UI design. Based on our expertise and superior commitment to our client’s growth, our firm has recently been listed as one of the best web developers in Washington, DC and in Baltimore, MD by Clutch!
Clutch is a third-party site that provides ratings and reviews for thousands of B2B service providers to help companies through the buyer journey. As a company that focuses our efforts on our clients’ success, it is rewarding to know that our 5 out of 5-star rating comes from their positive feedback! Here are a few examples of what our clients had to say on our ability to deliver and their experience working with the Modern Signal team:
“The fact that I’ve kept them on for 8 years is a testament to their quality.”
"I've been dealing with websites for more than 15 years. Modern Signal has far and away been the easiest to work with, the most responsive group of people."
"We've done many projects with Modern Signal through the years, and we've had a seamless, wonderful working relationship with them."
However, our spotlight doesn’t end on Clutch! In fact, our leader status on their platform resulted in our feature on their sister websites, The Manifest and Visual Objects. On these sites, we are listed among the top web designers in Baltimore. In addition, users are able to see how we match up against other agencies in the area, and actual representations of our work, which is why we’re excited to be included.
Thank you to our clients for sharing such candid comments and to Clutch. We are confident in our abilities and look forward to continuing our growth as we take on new projects in 2020!
Comments (0) Posted on February 15, 2019 10:38:31 AM EST by Jennifer Frias
This is a bare-bones, step-by-step guide for setting up a .NET MVC site to connect to the Salesforce API. Just the facts.
Get the Enterprise WSDL and Security Token
Login to a salesforce.com sandbox to begin. To get to the sandboxes for a live instance of Salesforce, go to the upper right hand and click on your name. Select "Setup" in the menu. Once there you can go to the lower left and click data management, and you will see sandbox listed under there. There is a login button to log in to the sandbox from there.
To generate the WSDL go to Setup => Develop => API => Generate Enterprise WSDL
Click the Generate button and save the resulting file to your computer.
To generate a security token go to Setup => My Personal Information => Reset My Security Token
Click on Reset Security Token to get a security token sent to your email address. You will need that later.
Set up the service reference
Add a service reference in Visual Studio. For the address, enter the path to the WSDL file you downloaded. For the namespace enter SalesforceService, or whatever makes sense for your project.
Binding and endpoint configuration information will be automatically added to your Web.config file.
Add settings in Web.config for the salesforce login. E.g.
<add key="SalesforceUsername" value="[email protected]" />
<add key="SalesforcePassword" value="Qal3jR......" />
The password is a combination of the password used to login to the site and the security token you got earlier.
Use transformations in your Web.Release.config file to set the endpoint and login for the live server.
Working with Salesforce
A small utility file, such as this example, makes working with Salesforce pretty easy.
For example, to create a lead:var sf = new SalesforceUtil();
sf.SaveLead(new Lead
{
FirstName = "Joe",
LastName = "Shmoe",
Email = "[email protected]
});
Error Workaround
You may get the following error when your site tries to connect to Salesforce (I did both times I set this up):
Unable to generate a temporary class (result=1).
error
CS0030: Cannot convert type
'MySite.SalesforceService.ListViewRecordColumn[]' to
'MySite.SalesforceService.ListViewRecordColumn'
...
The fix (which I found here: https://developer.salesforce.com/forums/?id=906F0000000Aj5kIAC) is pretty easy. In the auto-generated Reference.cs file for the service reference, search for this:
ListViewRecordColumn[][]
and replace it with this:
ListViewRecordColumn[]
More Documentation
SOAP API
https://developer.salesforce.com/docs/atlas.en-us.api.meta/api/sforce_api_quickstart_intro.htm
SOQL Queries
https://developer.salesforce.com/docs/atlas.en-us.soql_sosl.meta/soql_sosl/
Comments (0) Posted on February 25, 2016 10:03:40 AM EST by David Hammond
 It’s hard to put a finger on what makes a good website design go the extra mile to be amazing. That’s why the team at Modern Signal is careful to know where to go for the best, most useful information on top industry trends. It all comes back to making sure we deliver the best design and database solutions on the market.
Here are our team members’ top three picks for go-to websites to answer any question: from UI/UX and web design, to SEO and technology trends:
Best Site for UI/UX Development: Nielsen Norman Group
“I get the email alerts from this group,” says co-founder Eleanor Frias. “I love the concept of putting usability first, above everything else.”
The Nielsen Norman Group is a leading voice in the user experience field. They conduct research and evaluate interfaces of all shapes and sizes. For a taste of their commentary, try “Flat Vs Deep Website Hierarchy,” which provides valuable insight into structuring your website. The post “Serif vs. Sans-Serif Fonts for HD Screens“ is also worth reading, revealing that the trend of nicer computer screens has lead to new usability guidelines for on-screen typography.
Other strong IX/UX and web design websites for us include A List Apart and Smashing Magazine, which both feature articles with lots of personality and opinion.
Best Site for SEO: The SEO Book Blog
“I visited this site a lot during my initial research of SEO,” said Cathy Field, Modern Signal’s veteran project manager.
The SEO Book Blog provides great content for marketing, search, and online business from an algorithmic, publishing, and business model perspective. If you’re just getting started with SEO, try “How to Win in Local Internet Marketing”. For a more intermediate level education, “Optimizing the SEO Model,” a post that discusses Google’s recent algorithm shift, is a valuable investment of time.
Runners up? Try Moz and Search Mojo. Says Cathy, “I found that Google brought me to all three of these sites and answered most of my SEO questions.”
Best Development Website: Stack Overflow
This site is the first stop for co-founder and veteran developer, David Hammond. Says David, "9 times out of 10 it has the best answers to technical problems and questions that come up in the course of development”.
Wondering where to start? Stack Overflow is based on a forum model and is great for problem-solving, so visit the homepage and perform a search for anything specific you’re looking for, including particular topic tags. Popular questions include “How Can I Prevent SQL Injection in PHP,” and “The Definitive C++ Book Guide and List,” and forum threads are updated regularly.
For more tech blogs, we also recommend Simple Talk for SQL Server, Scott Gu’s Blog for ASP.NET, and Raymond Camden's Blog for ColdFusion, PhoneGap, and jQuery.
Did we catch any of your favorites? Let us know in the comments if there’s a great blog we’re missing out on!
Comments (0) Posted on December 16, 2013 10:35:42 AM EST by David Hammond
You’ve probably seen all sorts of maps around the web, the most common being directional maps for restaurants or other businesses, like this one for PF Chang's.
This type of map is used commonly to map out business locations. However, there's more to dynamic mapping than location maps. Here are some examples of maps you can easily integrate into your site.
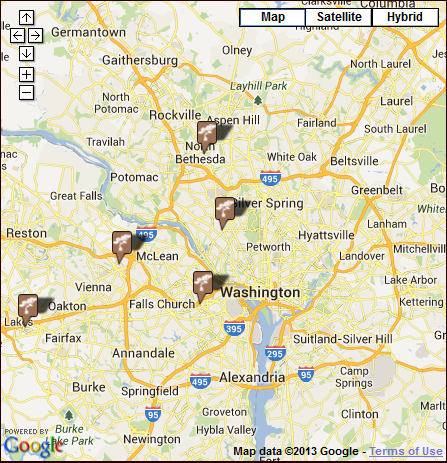
Maps with placed markers
The simplest map involves hand placing and editing each of your markers on the map individually. This, obviously, is not the best way to map a lot of data, but if you need a quick map, it’s the way to go. Using Google’s My Maps is the easiest way to do this.
Here’s a super quick map we put together to show some favorite restaurants in Richmond, VA. It was simple to create and easy to embed here. All the information you need to do this for your site is available at Google's My Maps.
Markers pulled from database
Our dynamic map for Public Service Jobs Directory (PSJD) is a great example of what you can do with Google maps using data from a database. PSJD is a job search site for people in the law profession who’d like to work in public service. Job search results display in a grid or in a map.
We also implemented a Google map for Hidden Creek Apartments that's been customized to reflect Hidden Creek's branding elements and look-and-feel. Note that this map has custom icons indicating the type of amenities that are marked and navigation that allows the user to choose the display. Layers in the map allow users to filter results.
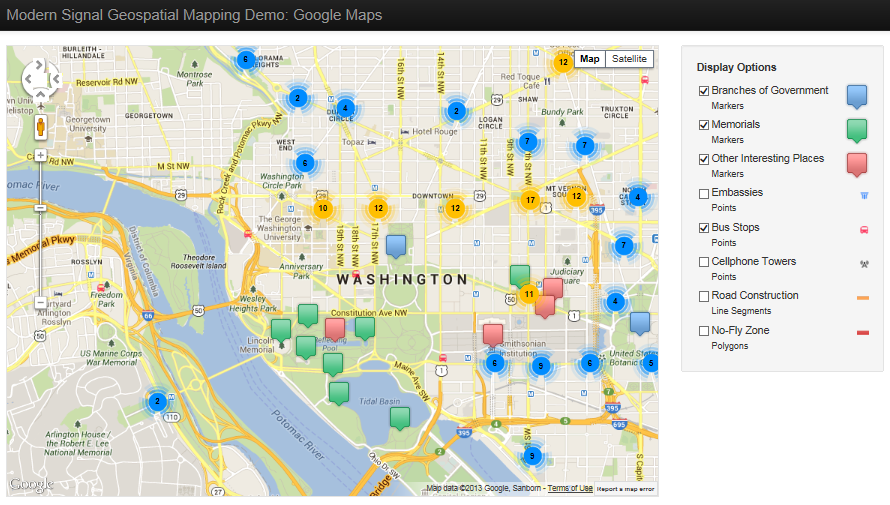
Maps using geospatial data
One step further is a map type that uses geospatial data to populate the markers. We’ve created a couple examples of this type of map using Google maps and also with Leaflet, a javascript library for maps.
So you want a map
Before jumping in and putting maps all over your site, you'll want to think about a few things. As with most things, planning is essential. Think about the questions below.
What is your map’s purpose?
In other words, what questions will it answer for your users? Simple directional maps answer the question “Where is it?” but maps that integrate more complex sets of data may not have such clear questions and answers. Think about your data and how you want your users to use it.
Where will you get the data?
Determine where you can get other data, whether from your own database or through geospatial data offered by third-party providers. For example, for our DC-area map examples, we used the map tiles and geocoding service from Cloudmade.com.
Learn more
There are quite a few blogs and sites devoted to mapping, from the map collection at the Library of Congress to Google’s mapping blog. The National Geographic site includes a vast print map collection as well as interactive maps that incorporate photography, video, and data to illustrate trends and developments around the world. For fun and inspiration, check out the Strange Maps posts on Big Think where you can find a Tacography of Mexico and the Procrasti-Nation map. And to play around a bit with creating your own map, give National Geographic’s MapMaker Interactive a try.
Comments (0) Posted on June 13, 2013 5:05:50 PM EDT by Sally Byrd
In a previous post, I described my experience working with Facebook Login integration. I recently implemented Google login integration (aka Google+ Sign-In), which is very similar to Facebook's integration. This feature enables Google users to login to your site using their Google credentials. As such, the user does not need to create and remember a username and password for your site. Their Google credentials are used instead.
Here is the main page on Google's site regarding Google+ Sign-In: https://developers.google.com/+/web/signin/. The majority of the information is very straight-forward. However, I will share a few pieces of code that pulled it all together for me.
Here is my signinCallback function code, which redirects the browser window upon successful Google login. Note that the accessToken parameter is sent to our server for further processing.
function signinCallback(authResult) {
if (authResult['access_token']) {
// Successfully authorized
window.location =
"/MyAccount/GoogleLogOn?returnURL=@(Request["returnURL"])&accessToken="
+ authResult['access_token'];
}
}
Here is my server-side C# code that uses the accessToken provided by Google to obtain the associated Google UserID.
string googleUserID = "";
using (var webClient = new System.Net.WebClient())
{
var json = webClient.DownloadString("https://www.googleapis.com/plus/v1/people/me?access_token=" + accessToken);
JObject o = JObject.Parse(json);
googleUserID = (string)o["id"];
}
Once we have the associated Google UserID, we can poll our database and confirm that a user exists in it with this associated Google UserID. If so, we can log the user in.
Comments (0) Posted on March 11, 2013 4:43:46 PM EDT by Emily Guyton
In November 2012, Modern Signal launched a redesign of our site. We were (are!) very proud of how it looked and the ways it would allow us to keep future and current clients better informed. One problem: it wasn't responsive. Our redesign had been in the works for a while, and the design had been approved and finalized before we became fully aware of a new reality: because of the proliferation of smartphones and tablets, modern websites must adjust to a wide variety of screen sizes. They must be responsive.

The problem was that we had just invested considerable time and energy in redesigning our site. We were happy with the way it looked on desktop browsers, and we didn't want to start over. The question arose, can we keep our design and just make it responsive? This same question has started to come up with many of our clients too, and so it was definitely worth investigating.
If you ask a designer whether you need to start from scratch to make your site responsive, they are likely to say, more or less, yes. That is, you may be able to keep much of the overall look and feel of your site, but you'll have to rethink so many things you are better off starting over. I'm not a designer, though. I'm a developer with years of experience in the trenches with html, css, and javascript. And so in my usual naivete I thought, "How hard could it be?"
"How Hard Could It Be?"
The answer to this question is, of course, "It depends." The designers are right in that you have to rethink many of the visual elements of your site in order to make it responsive. You likely have a top navigation bar with drop-down menus. You likely have a side navigation bar which will not fit on smaller screens. You may have some fixed-width background images that are not going to expand and contract the way they need to in a responsive site. The Modern Signal site had all of those things.
In the end, though, all of these challenges were surmountable with css, elbow grease, and just a little bit of targeted redesign. I'll take you through how we tackled these challenges.
"What Needs to Change?"
The first step in making any existing design responsive is to walk through the site to identify things that have to change. Mainly you are looking for:
There are other less well-defined things you might want to consider, like how much content people will comfortably scroll through on a phone, but these are the biggest red flags. In our site this list brought up:
So, knowing what I needed to attack, I dove in.
BootStrap - Laying the Groundwork
First things first. We had become familiar with Twitter's Bootstrap framework. We like it for its attractive set of widgets as well as it's framework for building responsive sites. The first step, then, was to integrate the Bootstrap CSS files and change the html of the site to use the Bootstrap concepts of "rows" and "spans". I won't delve into this too much as I doubt there is much I can add to the information already available.
"How to Go from Fixed-width to Expandable?"
Our right navigation presented an immediate problem: it used fixed-width background images in order to give it a distinctive banner look and feel:
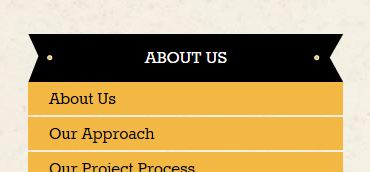
The html and css looked very like this (only including relevant css):
html:
<h3 class="subnav-section">
<a href="/aboutus">About Us</a>
</h3>
css:
.subnav .subnav-section a {
background: url('../images/subnav-section-bkg.png') 0 0 no-repeat;
}
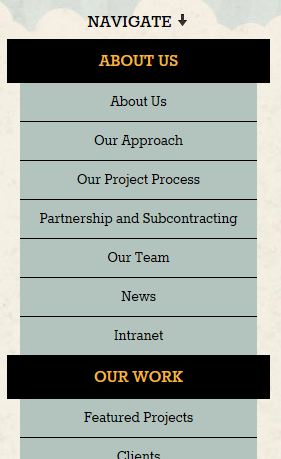
This is simple, effective and ... not responsive. In the end, I ended up coming to terms with an ugly fact: I couldn't fix this with css alone. At least not with the css available to me (maybe I can ignore IE6, maybe even IE7, but not IE8!) I would have to add a little html to make it work. What I ended up with was:
html:
<div class="banner-header">
<h3>
<a href="/about_us">About Us</a>
</h3>
</div>
css:
.banner-header {
background: url('../images/banner-bkg-left.png') left 0 no-repeat;
padding-left: 30px;
}
.banner-header h3 {
background: url('../images/banner-bkg-right.png') right 0 no-repeat;
padding-right: 30px;
}
I added an extra div tag around the header. The background of the div tag is the left side of the banner, while the background of the h3 tag is the right side of the banner. The middle of the banner is, mercifully, just a plain black background and can expand to its heart's content. This worked well, and only forced me to add one html tag.
On to the next challenge...
"How to Unclutter the Top Navigation?"
Our top navigation is a relatively simple line of links with drop-down menus that appear when you hover over the links. They wrap fine, but get pretty jumbled on small, phone-size screens. They also use hover actions to display submenus, which doesn't work on devices that use touch screens.
Here is a case where simply rearranging the existing design elements didn't work. We needed to rethink the design a bit. The default Bootstrap template deals with this by transforming the navigation into a single button that displays a drop-down of the entire menu when clicked. We ended up using the same idea:
What's important to note about this is that we didn't need to rethink the design of our entire page to accomplish this -- we just had to rethink this one element.
"What About the Carousel?"
Our next challenge was dealing with the carousel on our home page. Large home page carousels are very popular on websites nowadays. They're splashy and can be used to draw the visitor's attention to news, products, featured services, etc. They usually, however, take up the full width of the page and so present a problem for responsive design.
So, it's a common problem, which is fortunate. I quickly found Flexslider, which handled most of the responsive challenges for me. It took very little time for me to replace our current carousel code with Flexslider.
We still had a problem, though. The items in our carousel contain images and text. We can make the images progressively smaller, but at some point we just don't have enough room to make the text fit over the images without making the text too small to see. The answer for us was to hide things progressively as the page width gets smaller. This is very easy to do using some built-in Bootstrap classes. If you want something to be hidden on tablet-sized devices or smaller, use the "hidden-tablet" class:
<div class="hidden-table">...</div>
If you want something to be hidden on phone-sized devices or smaller, use the "hidden-tablet" class:
<div class="hidden-phone">...</div>
Using these classes, we hide the descriptive text in the carousal on devices smaller than 1024px wide, and we hide the carousel altogether on devices smaller than 768px. So go from:
on large devices to:
on medium-sized devices to:
on very small devices.
Conclusions
In the end, we're very happy with the results of the responsive web design overhaul of our site. We got it done much faster and cheaper than we would have had we gone back to the design phase. Of course, if we had been in the market for a full redesign anyway, we would have done that, but we were happy with our design and just wanted to add some responsive sugar to it, to in effect make it a mobile website and a tablet website as well as one that looks good on the desktop. We have heard from a lot of people who are in the same boat, and I hope this post gives heart to those who would like a responsive site but are not ready for a redesign.
Interested in implementing responsive elements on your own site? Download this checklist of things you should keep in mind.
Comments (0) Posted on February 25, 2013 12:19:48 PM EST by Emily Guyton
I recently worked on integrating "Login with Facebook" functionality into our Lighthouse.Net CMS. This feature enables users to login to a third-party website using their Facebook credentials. As such, the user does not need to create and remember a username and password for your site. Their Facebook credentials are used instead.
While I found a lot of information online about this integration, I was unable to find a great resource that fully explained how to get from the user successfully logging in using their Facebook credentials (which occurs in the browser using Facebook's Client-Side Javascript SDK) to securely logging the user into our site. Here are the questions I had and how I addressed them:
Question 1:
What data do we need to store in our Users database table to support Facebook integration?
Answer 1:
We added a column for FacebookID. This is an integer value generated by Facebook that serves as the primary key for each user.
Question 2:
When a user logs in using the "Login with Facebook" button (which happens in the browser using the Javascript SDK), what data do we need to pass from the browser to our server to log the user in to our app.
Answer 2:
When a user successfully logs in using Facebook's Client-Side Javascript SDK, an OAuth 2 access token is exposed to your Javascript code (accessible as response.authResponse.accessToken). This token is a temporary token which can be used to retreive data for this user using Facebook's Social Graph API. Here is the login flow our software follows:
This logic relies on the fact that the access token generated by Facebook is complex, temporary, and unique. If an access code can successfully be used to retrieve a FacebookID from the Social Graph, we can trust that the FacebookID we receive back is associated with correct user. This takes the place of a user entering their username and password into a web form.
Here is the HTML and Javascript code required to add the Login with Facebook button to your site.
<script src=https://connect.facebook.net/en_US/all.js type="text/javascript"></script>
<script>
$("document").ready(function () {
// Initialize the SDK upon load
FB.init({
appId: 'YOUR_FACEBOOK_APPID', // App ID
channelUrl: '', // Path to your Channel File
scope: '', // This to get the user details back from Facebook
status: true, // check login status
cookie: true, // enable cookies to allow the server to access the session
xfbml: true // parse XFBML
});
// listen for and handle auth.statusChange events
FB.Event.subscribe('auth.login', OnLogin);
});
// This method will be called after the user login into facebook.
function OnLogin(response) {
if (response.authResponse) {
window.location = "/FacebookLogOn?accessToken=" + response.authResponse.accessToken;
}
}
</script>
<div id="fb-root"></div> <!-- This initializes the FB controls-->
<div class="fb-login-button" autologoutlink="true" scope="" >Login with Facebook</div> <!-- FB Login Button -->
<br /><br />
Comments (2) Posted on November 28, 2012 10:30:41 AM EST by Adam Polon
I was recently looking for a way to throttle the number of requests to a site from bad bots that sometimes flood a server with dozens of requests in a few seconds. I found a very nice simple function by Charlie Arehart:
http://www.carehart.org/blog/client/index.cfm/2010/5/21/throttling_by_ip_address
Before proceeding, you might want to look over Charlie's article, which nicely lays out many of the considerations and caveats that come with limiting the number of requests by IP address.
Aside from all the caveats, Charlie's function had a couple things I wanted to adjust. One was that, as written, it would block even "good" bots, like Googlebot, if they made requests more frequently than the "duration" parameter. For instance, if you set it up to allow up to 6 requests every 3 seconds (as I did), it would end up blocking Googlebot from making a steady stream of requests at the frequency of once per second. So even though Googlebot was only making 3 requests every 3 seconds it was getting blocked.
Adjusting Charlie's function to stop doing that was very easy. But the other thing I was concerned about was whether keeping a list of IP addresses in an application variable would scale very well. How long would the list have to be before it would affect performance? I didn't really know, but felt it would be better to have a solution where the list would have old IP addresses pruned periodically. I toyed with the idea of using a scheduled task to go through the list and removed old entries. That seemed cumbersome, though. In the end, since the site I was working on was running ColdFusion 9, I thought it would be a good opportunity to use ColdFusion 9's new caching functions. Using ColdFusion's built-in caching functions means the I can have old IP addresses cleaned up automatically.
So here is my version of the rate limiter. This is generally more forgiving than Charlie's version of the function. In Charlie's version if a bot is blocked but continues to make requests (e.g. Googlebot), it will continue to be blocked until it pauses for the "duration". In my version, the bot is blocked for the "duration" and then allowed to make more requests before being blocked again. My main goal is to block the rogue bots that flood the system with 10 or 20 requests a second for a short time, and this does a pretty good job of that.
<cffunction name="limiter">
<cfargument name="duration" type="numeric" default=3>
<cfargument name="count" type="numeric" default=6>
<cfset var cacheId = "rate_limiter_" & CGI.REMOTE_ADDR>
<cfset var rate = cacheGet(cacheId)>
<cfif isNull(rate)>
<!--- Create cached object --->
<cfset cachePut(cacheID, {attempts = 1, start = Now()}, createTimeSpan(0,0,1,0))>
<cfelseif DateDiff("s", rate.start, Now()) LT arguments.duration>
<cfif rate.attempts gte arguments.count>
<cfoutput>
<p>You are making too many requests too fast,
please slow down and wait #arguments.duration# seconds</p>
</cfoutput>
<cfheader statuscode="503" statustext="Service Unavailable">
<cfheader name="Retry-After" value="#arguments.duration#">
<cflog file="limiter" text="#cgi.remote_addr# #rate.attempts# #cgi.request_method# #cgi.SCRIPT_NAME# #cgi.QUERY_STRING# #cgi.http_user_agent# #rate.start#">
<cfif rate.attempts is arguments.count>
<!--- Lock out for duration --->
<cfset cachePut(cacheID, {attempts = rate.attempts + 1, start = Now()}, createTimeSpan(0,0,1,0))>
</cfif>
<cfabort>
<cfelse>
<!--- Increment attempts --->
<cfset cachePut(cacheID, {attempts = rate.attempts + 1, start = rate.start}, createTimeSpan(0,0,1,0))>
</cfif>
<cfelse>
<!--- Reset attempts --->
<cfset cachePut(cacheID, {attempts = 1, start = Now()}, createTimeSpan(0,0,1,0))>
</cfif>
</cffunction>
Comments (4) Posted on April 2, 2012 2:58:45 PM EDT by David Hammond