The Lighthouse Content Management System (CMS) Site Editor is an interrelated set of online tools designed to let you easily add, edit, delete, and search your website content. With these tools, you and others in your organization with the proper permissions can:
As you become familiar with the Lighthouse CMS Site Editor and its features, you’ll find it easier and easier to add pages, making your site more robust, and to modify pages, keeping your site current.
As you work with Lighthouse CMS Site Editor, you will come to appreciate how its robust feature set can support large scale sites, but is affordable for medium and small scale web presences. You’ll also see that it works with virtually any website design and is quickly implemented with just days between set-up and launch. Using the browser-based WYSIWYG editor, you and others working on your site will appreciate:
Lighthouse CMS Site Editor works on both PCs and MACs.
This User Guide outlines the basic functionality of the Lighthouse CMS. There are step-by-step instructions for frequently performed tasks, such as adding a new page to your site or managing user permissions. The guide also provides information on each of the toolbar functionalities as well as tips for adding content effectively.
When you log on to your CMS site, you will see a screen similar to this:

or this:

This content administration screen displays links to the CMS and those tools through which you will manage the various aspects of your website. Each content administration screen contains a customized collection of tools, reflecting the unique needs of your specific website. Frequently used tools include manage admin users, which will allow you to control administrative accounts and manage admin links, which allows you to set up easy links to frequently used tools/searches. Your CMS may also include newsletter, publication, products, and other tools, depending on the type of functionality your website has. Detailed information on some common types of tools follows.
Additional tools may be created to meet the specific, identified requirements of your site. For example, if your site contains a press release section, a Press Release Management tool will be incorporated into your CMS management tool and a link placed on your content administration screen. The same would hold true for publications, products, etc.
Links to tools used to manage administrative accounts and access to various sections of your site.

Manage Admin Users: Tool used to add, edit, delete, and assign categories of administrative privileges for users, provide these users with log in information, identify the level/extent of permissions, and note their active/inactive status.
Manage Admin Links: Tool used to add, edit, delete, and search links to the CMS administrative tools and to quickly identify all users of, and manage access to, those tools.
Manage Admin Link Categories: Tool used to organize CMS admin links into convenient, logical categories, and manage (by adding, editing, or deleting) these categories.
Manage Permissions: Tool used to manage the permissions drop-down list found in the Manage Admin Users tool.
Links to tools for building and managing your site.
Additional tools may be created to meet the specific, identified requirements of your site. For example, if your site contains a press release section, a Press Release Management tool will be incorporated into your CMS management tool and a link placed on your content administration screen. The same would hold true for publications, products, etc.

Manage Pages: Tool used to comprehensively manage the properties of all existing pages (for example, titles, template, topics, status, and permissions). Also provides histories of pages, links to edit content, and search.
Manage Page Templates: Tool used to add, edit, delete, and search for templates available for use on your site.
Manage Members: Tool used to add administrative users, to assign log on credentials, and to assign and search membership in user groups.
Manage Page Statuses: Tool used to identify and add stages of the workflow/publishing process, to identify or search for those users with access at each stage of the publishing process (“Work in Progress,” “Ready for Review,” “Ready to Go Live,” “Live”), and to set the workflow order.
Manage User Groups: Tool used to add, edit, delete, and search user groups.
Manage Topics: Tool used to “tag” pages with links to other pages within the site containing related information. Topics tags are used as filters for search.
Manage Sections: Tool used to add, delete, and search the sections of your website as displayed in the primary navigation.
Search Engine Awareness: Link to instructions for and information about submitting your website URL to Google and Yahoo.
Restore Deleted Pages: Tool used to restore previously deleted website pages.
Each Lighthouse CMS tool, except the site editor, is made up of a series of database tables that are designed to be easy to navigate, use, and modify. Most tools will have add, edit, search, and delete capabilities, and you can easily personalize your view of the tools to suit your needs.
For example, a typical administrative tool is the Manage Admin Users tool where you can manage information and permissions for your administrative users. When you first enter the tool, you’ll see a View page similar to this, with a number of fields showing in the data table.

To search the records, select Search and enter your search criteria. In the Manage Admin Users tool, data elements you can search on include user name, permissions, email address, user group, and others. These fields will be specific to your particular implementation.

Tables in each tool can be modified to suit your needs. Click on a column header to see your options.

Click on the + sign to add a column to your view.

Delete columns by clicking on a column title and selecting Hide Column.

You can also change your display by clicking Display Options at the bottom of the screen. Here you can change all of your display options. The default columns that display are highlighted. Hold down the Ctrl key to select or deselect columns. If you select Remember my Display Preferences, your preference will save for the next time you log in; if you do not select this, your preference will only save for the current session. You can also change the order in which columns appear and the number of records to display on each page.

The content on your site that is not controlled by other administration tools is editable through the Edit Site interface. Select the Edit Site menu option to open the site editor.

The following toolbars and fields will surround your website homepage. You will use these toolbars and fields to add, edit, and delete content and pages in your website.

 This Lighthouse CMS feature lets you easily define or modify page properties and settings. Once you have opened a specific page, the top pane on the left side of the screen describes information about the current page. The bottom pane lets you easily navigate through the site in its current state.
The fields in this pane control page labeling and navigational issues. Editors or administrators will use them to:
Name – Choose a unique name for each website page; it will determine the page’s URL. This name should be in lower case
Link – Auto-generate the URL based on the name provided in the field immediately above.
Page Title – Choose the label that will appear in the page header section.
Navigational Title – Choose the label that will appear in the breadcrumbs and, if selected, the left navigation bars.
Browser Title – Choose the label that will appear in the bar that runs at the top of the web browser
Meta Description – Create a brief page description that may appear in search engine results
Show in Navigation – Select whether links to a page will appear in the left side navigation
 Through Topics, you can associate, or “tag,” pages to automatically display links to pages containing related information, thereby enhancing the user experience and facilitating more effective search.
Reach this function by choosing the “Topics” tab at the top of the left pane.
If this feature is incorporated into the front-end design, topic links will be displayed at the bottom of a page as defined during the design phase.
See Add Topics for more about using topics in your website.
 The buttons under this tab are used to control access to page content.
Members Only – Designate pages as private (available only to users with permission and log in authentication) or public (available to all website users)
If you choose “Yes,” the user groups defined for your site will appear in a new box. You can choose more than one group by holding down the shift or control keys.
See Managing User Groups for more information.
 As you create and modify pages, you will save them in various publishing workflow states. The links to those pages appear here.
Please note that editors and administrators will see pages as they progress through the workflow until they reach the stage immediately below their permitted access level. For example: If the highest status level you have is "Ready to Go Live," you only will see pages up to the "Ready for Review" pages.
This pane provides “at-a-glance” site navigation, letting editors and administrators easily identify the proper location within the website hierarchy for new or revised pages.
It also identifies the symbols used to identify members-only, inactive, and hidden pages.
Please note that the tab in the navigation pane selected at the close of a session will be remembered for the next session. This way, you can always have the My Pages or Navigate Site tab open when you load the editor.

1. To create a new page, first select Edit Site from the CMS management screen.

2. In the lower left hand panel, click on the tab for Navigate Site.

3. Navigate to the section and level where you want to add your new page.

4. Click the Create a New Page icon in the top toolbar. The following pop-up window titled Create a New Page will appear.

5. From the Select a Template drop-down menu, select the appropriate template. Remember: You will have the option of selecting from templates created for each different type of page in your site. For example, a press release page would be a different template than an image gallery page. Note: You cannot create new section top-level pages.
6. Type the name of the new page – making sure the name does not duplicate any page names already in use – into the Page Title field. If you do inadvertently duplicate a page name, the name will be automatically changed. For example, an existing page is named “services” and the URL is http://demo3.modernsignal.net/services. If another page named “services” is created, the system will add a number to the end of the name, such as http://demo3.modernsignal.net/services2. The same name will automatically appear in the Navigation Title and Provide a unique name for the new page: fields.

7. Click the Show in Navigation checkbox to have the page appear to users in the website navigation. To keep the page hidden from public users, leave the box unchecked.
8. Click the Members Only checkbox to limit access to the page. This action requires you to specify the type(s) of user who can access the page content. Therefore, everyone who must access the page must also be included in the user type list. See Managing User Groups for more information. To have the content of the new page accessible to all public users, leave the box unchecked.
9. Click OK.
Your page has now been created. Notice in the left-hand properties window that the page name, link name, page title, and navigation title appear. Under the Navigate Site tab, you can also see where the page lives within the hierarchy of your site. At the top of the page, you’ll see that your work has not yet been saved and the page status is “Work in Progress.”

The CMS does not offer timed backup so you must save your work as you add new content or edit existing pages. To save your work, simply:
1. Click the Save icon in the top toolbar.

2. The following pop-up will appear:

3. Select one of the following options:
The choices you see will depend on the permissions you have.
The current page status is always displayed next to the toolbars.

Links to pages saved in any of the first two states of completion will automatically appear on your main content administration screen (under the same headings), greatly simplifying and streamlining the content review and approvals process. (The same links will appear in the My Pages navigation pane of the CMS accessed through Edit Site.)

Now that you’ve created the shell of a page, you’re ready to populate that shell with content. If you are returning to the CMS after having previously created the shell, simply navigate to the page by using the Navigate Site tab in the lower left-hand panel.
To copy and paste existing content from another location (for example, a Microsoft Word document or PDF):
1. Highlight the appropriate text or image(s).
2. Copy the content.
3. Paste the content into the area(s) surrounded by dashed lines on the new page.
4. Click on the Remove All Styles ![]() icon in the bottom toolbar. This will remove embedded styles from the previous source and apply the appropriate CMS default settings for font colors and sizes.
icon in the bottom toolbar. This will remove embedded styles from the previous source and apply the appropriate CMS default settings for font colors and sizes.

To edit content on a page:
1. Place your curser into the appropriate editable region (indicated by the dashed lines).
2. Use the tools available in the top, middle, and bottom WYSIWYG toolbars to make style changes to the page content (text and/or graphics), or delete content.
3. Save your work by clicking the Save icon ![]() in the top toolbar and making the appropriate status selection.
in the top toolbar and making the appropriate status selection.
To create hyperlinks in pages:
1. Place your curser at the appropriate location within the page content.
2. Highlight, or type then highlight, the text you want to link.
3. Select the Create a link ![]() tool. This following pop-up window, titled Link Properties, will appear:
tool. This following pop-up window, titled Link Properties, will appear:

You can create four types of links:
Link to a URL or email address
1. When the link properties box appears, simply enter the url or email address you want to link to and click OK.

Once your target link is identified, select either the Same Window or New Window option under Specify a target for this link:. Selecting New Window means that the information associated with the target link will appear in a pop-up window. Unless this is an unusual situation, you should choose Same Window.
Link to a page within your site
1. From the Link Properties window, select Choose a page on this site.
2. A pop-up window with your site map will appear.

3. Find the appropriate page in the site map and click on it. The Select a Page window will close and the proper link will automatically appear in the Link to a url or to an email address… field.

Link to a document
1. Select Choose a File from the Link Properties window.

2. The following pop-up window titled File Browser will appear:

3. To upload a new document, select Upload a New File.

4. Browse to the file you want to upload and select Submit.
5. To link to a previously uploaded document, simply navigate to the document and select Insert.

6. The link properties window will show the location and name of the file. Select OK to finish inserting your link.

7. Once the page is saved, the new link will launch the PDF (or other document) in a separate browser window.
Link to an anchor within a page
You may want to create links within a page. For example, if a page contains a large amount of content, such as a lengthy Frequently Asked Questions page, editors or administrators may create a list of questions at the top of the page that will link to the bookmarked answers lower in the page.
1. Create bookmarks in your text by highlighting the text you’d like to link to and clicking the create bookmark ![]() icon.
icon.

2. The Link Properties window will appear with the name of the link already filled in. You can also add alternative text and style attributes through the Advanced tab.
3. Click OK.
4. Create bookmarks for all the text you’d like to link to in your page.
5. Now you need to link to these bookmarks from another place on your page. So create a list of the topics you are linking to at the top of your page. Highlight each topic then click the Create Link icon![]() .
.
6. In the dropdown box, select the bookmark you’d like to link to and click OK.

Occasionally the best way to present or order information is in a table. In html, a table divides content into columns and/or rows. The Modern Signal CMS Site Editor lets you easily build and modify tables.
Tip: A good way to display a graphic image with text is by using a table. The image can be placed in one cell, the caption in another.
To create a table, simply:
1. Place your curser in the editable portion of the page on which you want the table to appear.
2. Click the Create Table ![]() icon in the bottom toolbar. A pop-up window titled Create Table will appear:
icon in the bottom toolbar. A pop-up window titled Create Table will appear:

3. Place your curser over the “1 by 1” table and drag the hand symbol outward to the right and down until you reveal the number of columns and rows you want for your table.
4. Click on the table. A pop-up window titled Table Properties will appear:

5. By default, new tables have no border, cell padding of 5, and no cell spacing. To change the default and obtain a different look for your table, simply highlight and revise the numbers in the Border:, Cell padding:, and/or Cell spacing: fields. Please note:

6. Click OK and your table will appear on the page.
Modify a table
By default, newly created tables have no border, cell padding (margins within the cells) of 5, and no cell spacing (top, bottom and side spacing between two cells). You can change these defaults by selecting the Table Properties icon ![]() and modifying these items in the web dialog box.
and modifying these items in the web dialog box.
You can also modify the alignment of text and graphics within a table cell or table row by using the Table Row ![]() or Table Cell
or Table Cell ![]() tools. You can also modify the background color of cells in a table. Both of these tools are located on the bottom toolbar to the right of the “Table Properties” icon.
tools. You can also modify the background color of cells in a table. Both of these tools are located on the bottom toolbar to the right of the “Table Properties” icon.
If you want to add or delete columns and rows from an existing table, simply use the remaining table tools on the toolbar to make these table modifications. Scroll over each of these icons with your cursor for a description of each tool’s purpose.
Tip: Right-clicking in the table will display the icons for Table Properties, Table Row Properties, and Table Cell Properties.
To place an image on your website when the image has already been uploaded to the CMS:
1. Go to the page where the new image will reside.
2. Place your cursor in the exact spot where you want the image to appear on the page.
3. Click the Insert Image ![]() icon. The File Browser pop-up window will open, displaying all available images that have been uploaded to the site. To use one of these images, simply click on the Insert link below the image. The image will be automatically placed in the body of your page.
icon. The File Browser pop-up window will open, displaying all available images that have been uploaded to the site. To use one of these images, simply click on the Insert link below the image. The image will be automatically placed in the body of your page.

To upload an image to the CMS for use on your website:
1. Click the Insert Image tool. The File Browser pop-up window will open. Click on Upload a New File.

2. Click on Browse and locate the document or image on your local machine.
3. Select your file. The file name will appear in the pop-up window field.
4. Click Submit.
5. Go to the page where the new image will reside.
6. Place your cursor in the exact spot where you want the image to appear on the page.
7. Click the Insert Image tool. The File Browser pop-up window will open, displaying all available images that have been uploaded to the site. Navigate to the image you have uploaded and click Insert.
Set Image Properties
To modify the properties of an image follow these steps:
1. Right click on the image placed in the page. This will bring up a button called Image Properties. Click this button. The following pop-up window will display:

2. Using the Info tab, you may:
Using the Advanced tab, you may:

3. Make the necessary changes through this dialog box and click DONE to see your changes reflected in the image on the page.
1. In the page you are editing, place your cursor where you would like your video to go.
2. Select the Insert Movie ![]() icon.
icon.
3. In the Movie Properties window, enter the URL of your movie and choose the format, Flash or Quicktime.

4. Select Choose a Movie to browse to a previously uploaded movie or to upload a movie to your site.
Imagine a user is reading a particular page of your website, and you know there are other pages containing similar or related information that would be of interest to him or her. Using Topics is a way to guide (or “navigate”) that user to the additional information, thereby providing him or her with a richer, more interesting experience with your site.
Using the powerful Topics tool is easy. Just follow these steps:
1. After creating or modifying a web page, determine if other pages in your site contain related information. If you identify such pages, think of a topic name that describes the connection. For example, a website about national parks might contain multiple pages containing information related to horseback riding. Using topics to link these pages provides the reader with an easy way to find related information.
Examples of topics on a corporate website might be “Ways <company name> demonstrates leadership” or “Ways our products are superior.”
2. From your site’s main admin screen, choose the Manage Topics Link.

2. Select Add, type in your topic name, and click Save Changes.

3. Go to Manage Pages.

4. Next to the page you would like to link the topic to, click View/Edit Properties.
5. Click Add Topic and choose the topic you’d like to link to from the dropdown

6. Click Save Changes.
-or-
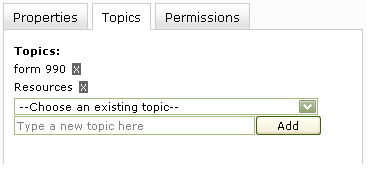
1. Using Edit Site, navigate to a related page.
2. Under the Topics tab, choose a topic.

You can also add a topic here.

To delete the page’s link to a topic, click the X next to the topic name.

Topics must be cross-referenced on two (or more) pages for the links to appear.
To navigate to specific pages within your website, simply:
1. In site editor, click on Navigate Site tab in the the lower left-hand pane.
2. Click through the site map to locate the desired page. Note that the ![]() symbol next to page title indicates the presence of additional “nested” pages within that section or subsection. Click the
symbol next to page title indicates the presence of additional “nested” pages within that section or subsection. Click the ![]() symbol to display these pages. The
symbol to display these pages. The ![]() symbol indicates that all pages within a section or subsection are displayed.
symbol indicates that all pages within a section or subsection are displayed.
3. Click on the title of the desired page and it will display in the editable area.
To move an existing webpage to a different location within the existing hierarchy, simply:
1. Use the site map under the Navigation Site tab to find the page you wish to move.
2. Click the title of the page.
3. Click on the Move Page ![]() icon in the top toolbar. A pop-up window titled Move Page will appear:
icon in the top toolbar. A pop-up window titled Move Page will appear:

4. Select from the three actions in the dropdown menu. These options are:
5. Locate your target page by clicking through the hierarchy, clicking the symbol as necessary.
6. Click the title of the target page. The new location of the page will be immediately reflected in the site map.
7. Verify that your page has ended up in the right location by looking at the breadcrumbs.
To delete a page, simply:
1. Click on Navigate Site (in the lower left-hand pane) and locate the page you wish to delete.
2. Click on the page title.
3. Click the Delete This Page ![]() icon. The following pop-up window will appear:
icon. The following pop-up window will appear:

4. Click OK and the page will be permanently deleted from the site.
A backup or archived version of each page is always just a click away. If you have a mishap, you can view and/or revert to an archived page by following these steps:
1. Click on the displayed web page.
2. Click the Work With Live or Archived Version icon ![]() on the top toolbar. The same web page you’re working on will appear in a second window with the following header:
on the top toolbar. The same web page you’re working on will appear in a second window with the following header:
![]()
3. Click on the drop-down menu to select a previous version of the page.
4. Select an archived version from the drop-down menu. (Note that each version listed has a timestamp indicating the date and time it was last saved.) The content of the page will change.
5. Save the revised page by selecting and clicking on Restore as Working or Restore as Live. If you change your mind and want to revert back to the original page content, simply click Close Window.
A dialog box will come up on your screen asking you to confirm your action.
To delete an archived page:
1. Click on the drop-down menu to select a previous version of the page.
2. Select an archived version from the drop-down menu.
3. Click Deactivate. Notice that the label changes to read: Delete Version. The following dialogue box will appear:

4. Click OK to complete the action, or Cancel to stop the action.
You control who has “behind-the-scenes” access to your web pages—identifying who may create new pages, edit existing pages, approve pages for publishing, etc. You exercise this control by creating user groups and identifying the members of those groups.
On the content administration system (CMS) index page, click the Manage User Groups link. This will display the User Groups: View screen:

Add a new user
Click the Add button. This will display the User Groups: Add screen.

2. Add the following information to the new User Group record:
3. Click Save Changes.
4. Click the View All button to see the updated list of user groups.
5. To edit an existing User Group, use the Edit button to the right of the User Group record on the User Groups: View screen.
6. To see a list of users within a particular User Group, click on the Show Users button to the right of the User Group record on the User Groups: View Screen. This will display the Users: View pop-up window. Admin users for the particular User Group can be added/edited/deleted through this window or can be managed using the instructions in the next section.
1. On the content administration system (CMS) index page, click the Manage Admin Users link. This will display the Admin Users: View screen.
2. Click the Add button at the top of the page.

3. On the resulting form, provide the following information of the new group admin user. Once data is added, the Submit button will change to read Save Changes.
4. Check the Active checkbox to grant immediate access to the admin user. Only admin users in active status may access the admin site.
5. Click Save Changes to add the new admin user to the database.